The shuttlecock drops steeply to the baseline. Your opponent is forced to take the shuttle at point X, which is near the baseline. He won’t have a good angle for a smash from so far back of the court.
Poor Defensive Clear
The shuttlecock travels flatter towards the baseline. Your opponent can intercept at point X, which is nearer to the mid court. A smash taken at point X can be dangerous and difficult to defend.
Objective of the Defensive Clear
The objective of the Defensive Clear is to ‘create’ time for yourself. When you’re not able to keep up with the pace of the rally, hitting High Clears deep into your opponent’s baseline would be a smart choice.
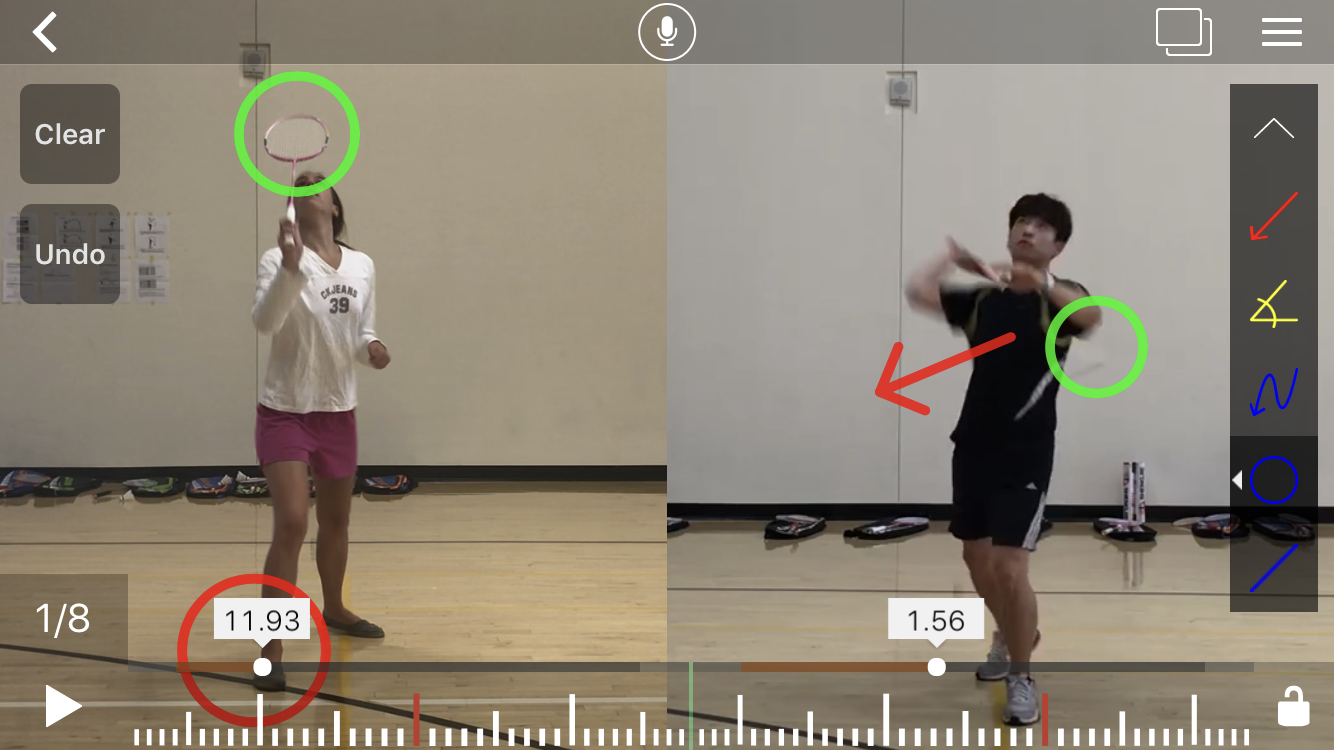
1. Move into position and get behind the shuttle. Adopt the Forehand Grip.
2. Raise your Racket Arm and Non-Racket Arm.
3. Your body should face sideways with your feet pointing slightly sideways.
Important Tip: Bend your knees slightly
4. Commence your Forehand Stroke. Stretch your Racket Arm to as far back as possible. Stretch out your Non-Racket Arm. Inhale. Then Exhale as you swing your racket forward.
Tip: Bend your Racket Foot lower than your Non-Racket Foot. As you swing your Racket forward, use your Racket foot to push your body weight forward.
5. Take the shuttle at the Highest Point possible.Contact Point: In step 1, you should place yourself right below the shuttle. So when you hit the shuttle, your swing will naturally direct the shuttle upwards.
Knees?: Straighten your knees as you reach out to take the shuttle at the highest point.
6. Complete a Full Arm Swing. Follow through with your swing even after you hit the shuttle.
7.Shuffle your Racket Foot forward as you swing your racket forward. After hitting your stroke, your body should face forward. Your Racket Foot should be in front of your Non-Racket Foot. Both feet should point forward.
(5 - 10 min) Initial Information by a teacher (Short Serve)
(30 min) Team Practice and Scrimmages
(5 min) Closure
Badminton Basic - Short Serve in Badminton
To do a short serve in badminton, stand closer toward the front baseline with your right leg forward. Improve your short serve in badminton with help from a badminton coach in this free video on badminton.
You would stand closer towards the front baseline with your right leg forward
To do the backhand short serve starts by having your backhand grip
your racket start by positioning the racket’s head face down in front of you
like so next put the shuttle in front and in the middle of the racket make sure
that you hold it by one of the feathers of the shuttle so you have good control and feel of the shuttle
Once you put in the middle the serve starts as soon as you go forward with your racket meaning you can do anything else before that but as soon as it goes forward it has to be in one smooth motion and it cannot stop so from here push forward gently with your fingers and over the net
Make sure the contact point is below your waist
A general tip for beginners for short serves is when you begin
Aim for the white tape on the net. This way you'll get to practice getting it right over the tape
Hold your club waist-high in front of you, horizontal to the ground, and square the club face.
Always grab the club with your left hand first. Stretch out the fingers of your left hand; align the club handle with your left palm so it makes a straight line diagonally across your fingers.
Close your hand around the club.As you grip the club with your left hand, the heel of your palm should rest along the top edge of the handle (but you should still be able to see the tip of the handle).
Rotate your hand to the right until you see two knuckles on your left hand when you look down. This will give you a neutral grip, which is a great starting point for lots of golfers.
Position the heel of your right hand on top of your left thumb, so it’s covering. left hand. Close your hand so your thumb and forefinger create a ‘V’ that points to the middle of your sternum.
Types of Golf Grips
There are three basic types of golf grips: the overlapping, interlocking and 10-finger grips. Of course, there’s no one-size-fits-all grip when learning how to hold a golf club, but it helps to know the differences.
10-Finger Grip
It’s called the “10-finger grip” because every one of your fingers is on the club. Not many professionals use this grip, but some newcomers to the game find it comfortable.
It can be a powerful grip because each of your fingers are touching the surface off the grip, and can be a well-suited grip for a golfer with small hands.
Overlapping Grip
The overlapping or “vardon” grip is one of the most common in golf. This is when you positioning the pinkie finger of one hand and placing it in the ridge between your other hand’s index and middle finger.
This grip’s biggest advantage is beneficial for anyone with particularly large hands.
Interlocking Grip
The interlocking grip starts with the 10-finger grip; you simply interlock one hand’s pinkie finger with the other hand’s index finger to get your hands closer together.
The biggest advantage is that this ‘locks’ your fingers together so both of your hands work together, which can give your golf swing some added power.
(5 - 10 min) Initial Information by a teacher (Rules and Grips)
(30 min) Team Practice and Scrimmages
(5 min) Closure
Rules
A player must wait until his opponent is ready before serving. If the opponent attempts a return then he is ruled having been ready.
The feet of both players must remain in a stationary position until the serve is made. Your feet can not be touching the line at this time.
It is not a fault if you miss the shuttle while serving.
The shuttle cannot be caught and slung with the racket.
A player cannot hold his racket near the net to ward off a downward stroke by his opponent or to interfere with his racket.
Faults
The shuttle, at the instant of being hit is higher than the servers waist or the head of the racket is higher than the servers racket hand.
The shuttle does not land in the correct service court.
The server's feet are not in the service court or if the feet of the receiver are not in the court diagonally opposite the server.
Any player balking or feinting his opponent before serve or during serve.
A serve or shot that lands outside the court boundaries, passes under or through the net, touches any other obstructions or a players body or clothing. The boundary and service lines are considered in play.
The shuttle in play is struck before it crosses the net to the striker's side of the net. You may follow through over the net.
A player touching the net or its supports with his body or racket while the shuttle is in play.
Hitting the shuttle twice in succession by a player or team.
Scoring System
A match consists of the best of 3 games of 21 points.
Every time there is a serve – there is a point scored.
The side winning a rally adds a point to its score.
At 20 all, the side which gains a 2 point lead first, wins that game.
At 29 all, the side scoring the 30th point, wins that game.
The side winning a game serves first in the next game.
At the beginning of the game (0-0) and when the server’s score is even, the server serves from the right service court. When the server’s score is odd, the server serves from the left service court.
If the server wins a rally, the server scores a point and then serves again from the alternate service court.
If the receiver wins a rally, the receiver scores a point and becomes the new server. They serve from the appropriate service court – left if their score is odd, and right if it is even.
Doubles
A side has only one ‘set’.
The service passes consecutively to the players as shown in the diagram.
At the beginning of the game and when the score is even, the server serves from the right service court. When it is odd, the server serves from the left court.
If the serving side wins a rally, the serving side scores a point and the same server serves again from the alternate service court.
If the receiving side wins a rally, the receiving side scores a point. The receiving side becomes the new serving side.
The players do not change their respective service courts until they win a point when their side is serving.
In general there are two different basic grips in badminton which is forehand and backhand grip.
Forehand grip is to hit the shuttle such as clear, drop shot, smash, drive, lifting shot, net play, low and high serve. you might want to apply this forehand grip when your opponent hit toward your right hand side.
Clock method
you will have to apply this forehand grip every time your opponent hit toward your 12 o'clock one o'clock two o'clock three o'clock four o'clock and five o'clock
How to hold the proper forehand grip?
First, apply a handshake grip just like you want to shake hands with someone
Second, grab your racket make sure you hold your racket on the lower area of your grip
I keep my index finger in the front and my thumb on the lower left flat side of the grip
Make sure you rest your thumb on the left side of the grip
Touch your thumb to your middle finger
Do not hold your racket too tight otherwise you will lose all the power
Try to stay loose.
Picture yourself that you're holding a blade right now
A blade from the knife
You don't want to hurt yourself so you don't want to squeeze your racket too high too tight
Try to stay this
I saw a lot of beginners, when they hold their racquet,
Big no no grip!
Don’t hold this kinds of grip because you will not be able to use the power from your wrist
So you want to keep your index finger in the front so when you hit the shuttle, you can apply power from your wrist.
Okay now let me show you what I mean by that
this is the simple proof that why using index finger and your wrist will benefit you
more in order for you to get more strength
Backhand grip (Pinching grip)
you might want to apply this backhand grip every time your opponent hit toward your
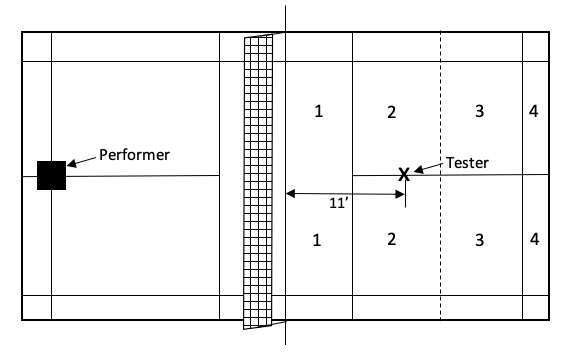
Poole Forehand Overhead Clear Test (French, Werner, Rink, Taylor, & Hussey, 1996). The performer stands on the X spot with his/her foot (right-handed - right foot, left-handed – left foot) and will receive a shuttle from a trained tester to hit it back over the net to the deepest corner of the court. When the performer hit shuttles, the tester will stand at point ‘X’ with holding a racquet overhead. The performer will hit a shuttle with an overhead forehand clear over the tester’s racquet. The tester will call out if the shuttle does not pass over the tester’s racquet. The performer will hit shuttles twenty times and the scores will be totaled for the clear test score. The maximum score will be 60 points.